From Blank Page to First Draft: A Practical Guide to Writing Your Novel
So you want to write a novel. You opened a new blank document, grabbed a cup of coffee, maybe lighted up a vanilla candle to set the atmosphere, and put some music on. And now what? How should you proceed? The words are not meant to appear by magic, not even in the Harry Potter’s universe.
As writers we all have to face the blank page. But how to overcome it, might be our own choice. That is why I decided to create this article, to help some fellow authors (specially those of you who are beginning) on a way to kick off your book. And let me be clear, this is about my personal process, and it is not the source of truth for everyone.
With that being said, I will guide you through my normal approach, from the idealization, through the mapping, and the wrap-up of the first draft.
Plant a Seed and Grow Your Novel
Before you sit down and start throwing words to your empty doc you need to pick the idea you think you want to write about. It could be something as simple as “a farmer found her rabbits grew up wings”. If you just thought about it, that may be the seed of your story. Write it down in your notebook, a piece of paper, or the notes app in your mobile.
The important thing here, is that you need to let it grow before you actually type the first phrase of your book. You will slowly find out that tiny sentence starts getting bigger with the days passing by. And just as a tree, you are going see when the story is ready to emerge and you can start with your first steps.
Why wait? Because rushing into writing with just a seed can lead to wandering narratives and dead ends. Your subconscious needs time to process the idea, to ask questions like: Who are these characters? What do they want? What’s stopping them? Why should readers care?
Give your seed a few days, maybe a week or two. Let it germinate in your mind while you go about your daily life. You’ll find yourself thinking about the story in the shower, during your commute, before falling asleep. These moments of passive thinking are where the magic actually happens.
Outline Your Plot
Once your idea has grown enough—when you find yourself thinking about it constantly, when new scenes pop into your head unbidden—it’s time to give it structure. This is where many pantsers (discovery writers) feel uncomfortable, but hear me out: outlining doesn’t mean losing spontaneity. It means having a map so you don’t get lost in the wilderness.
There are several approaches to plotting, and you should experiment to find what works for you:
The Three-Act Structure: The classic approach with a beginning (setup), middle (confrontation), and end (resolution). Simple, effective, and time-tested.
The ABDCE Structure: Action, Background, Development, Climax, and Ending. This structure, which I learned during Wesleyan University’s creative writing course, provides a more nuanced framework that works particularly well for character-driven narratives.
Save the Cat! Beat Sheet: Blake Snyder’s 15 beats that have become a staple in screenwriting but work beautifully for novels too.
The Hero’s Journey: Joseph Campbell’s monomyth, perfect for epic fantasies and adventure stories.
I personally use a combination of the ABDCE structure and my own intuition. I know the major turning points—the moments that will change everything for my characters—but I leave room for discovery along the way.
Your outline at this stage doesn’t need to be detailed. In fact, it shouldn’t be. You’re looking for the skeleton, not the flesh:
- Opening: Where and how does the story begin? What’s the hook?
- Inciting Incident: What event sets everything in motion?
- Midpoint: What major revelation or event occurs halfway through?
- Crisis: What’s the darkest moment for your protagonist?
- Climax: How does the main conflict resolve?
- Resolution: Where do we leave the characters?
Write these down in a few sentences each. You now have your roadmap.
Map Your Story with a Plot Grid
Here’s where we get tactical. If you’ve read my article on the Plot Grid, you know how powerful this tool can be for visualizing your entire narrative. If you haven’t, let me give you the quick version: a Plot Grid is essentially a table where rows represent chapters or scenes, and columns represent different plot lines, character arcs, or thematic elements.
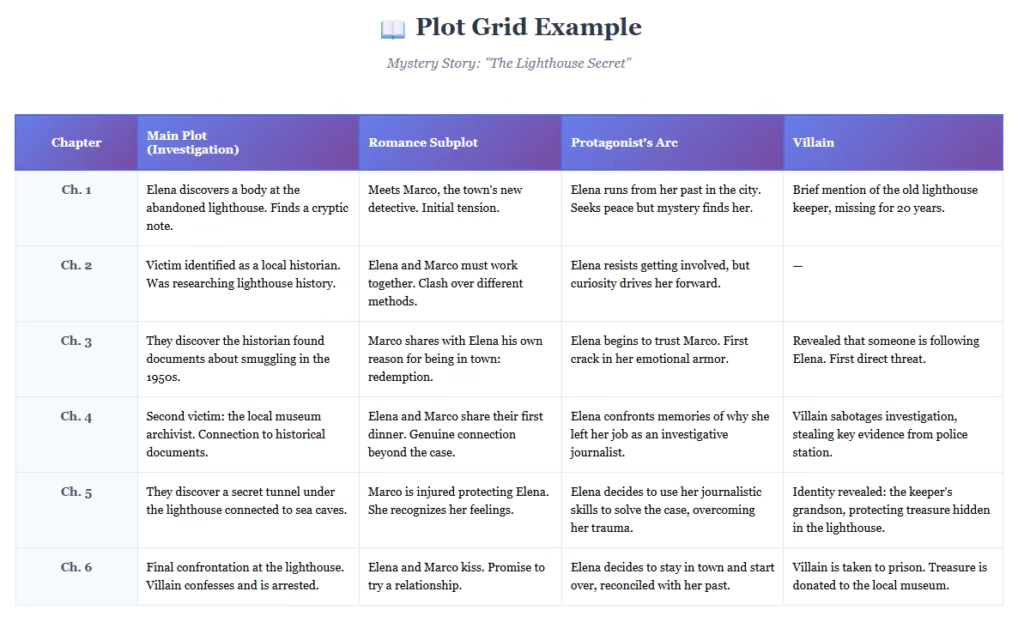
Why use a Plot Grid? Because it lets you see your entire story at a glance. You can spot:
- Chapters where nothing significant happens (and therefore might need cutting or enriching)
- Subplots that disappear for too long
- Pacing issues (too much action clustered together, or too many slow chapters in a row)
- Character arcs that don’t progress evenly
How to create your first Plot Grid:
- Set up your columns: At minimum, create columns for your main plot, your protagonist’s arc, and your antagonist’s arc. Add more columns for significant subplots or supporting characters.
- Create rows for chapters: Don’t worry about the exact number yet. Start with 20-30 rows as placeholders. You’ll adjust as you go.
- Fill in the grid: For each chapter, write a brief description (one or two sentences) of what happens in each column. For example:
- Main Plot: “Detective discovers the victim’s connection to the mayor”
- Protagonist Arc: “Detective begins to doubt her career choice”
- Antagonist Arc: “Killer plants false evidence at the scene”
- Review and adjust: Look for patterns, gaps, and opportunities. This is where you’ll discover that Chapter 7 might be empty, or that your antagonist disappears for five chapters straight.
The Plot Grid isn’t set in stone. It’s a living document that will evolve as you write. But having it gives you confidence that you’re not just wandering into the dark.
Tools for your Plot Grid: You can use Excel, Google Sheets, Notion, or specialized writing software. I use Scrivener, which has excellent features for this, but any spreadsheet software works perfectly fine.
Set Up Your Project in Scrivener (Alternative Step)
Speaking of Scrivener, if you’re planning to use this tool, now is the time to set up your project. This step is optional—many writers prefer Google Docs, Microsoft Word, or even plain text editors—but Scrivener’s organizational features make it particularly useful for long-form fiction.
Why Scrivener? It allows you to:
- Break your novel into scenes and chapters that you can easily reorganize
- Keep character profiles, location notes, and research in the same project
- View your Plot Grid alongside your manuscript
- Set writing targets and track your progress
- Export to various formats when you’re done
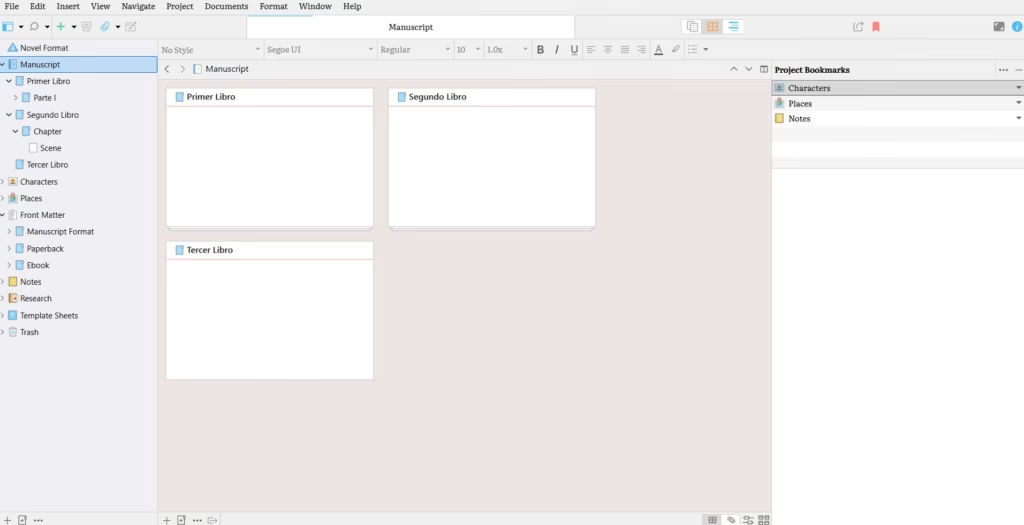
Setting up your Scrivener project:
- Choose the Novel template: Scrivener offers several templates. The Novel template gives you a good starting structure.
- Create your folder structure: I typically organize mine as:
- Manuscript (with folders for Acts or Parts, then subfolders for chapters, then individual scenes)
- Characters (document for each major character)
- Locations (descriptions of important settings)
- Research (anything that informs the story)
- Plot Grid (I create this as a table in a Scrivener document)
- Set up your metadata: Use Scrivener’s label and status features to track things like POV character, timeline, or completion status.
- Configure your targets: Set a daily or project word count target to help you stay on track.
If you’re not using Scrivener, create a similar organizational system in whatever tool you prefer. The key is having a place for everything so you don’t waste time searching for notes when you should be writing.
Develop Your Characters
Now we get to the heart of your story: the people who will live it. And yes, I said “people” even if you’re writing about dragons, aliens, or sentient clouds. Characters are what readers connect with, what they remember long after they’ve forgotten the intricate plot twists.
The essentials you need to know:
Before writing a single scene, you should be able to answer these questions about your main characters:
What do they want? Not just in the story, but in life. Surface desires (solve the murder, save the kingdom) and deeper needs (prove their worth, find belonging) often conflict, creating compelling internal tension.
What’s stopping them? External obstacles (the antagonist, society, circumstances) and internal ones (fears, flaws, false beliefs).
What’s at stake? What do they lose if they fail? What do they gain if they succeed? Make sure the stakes feel personal and significant.
What’s their ghost? The past wound or event that shaped who they are today. This informs how they react to current challenges.
Create character profiles: You don’t need extensive biographies, but document the essential details:
- Basic facts (age, appearance, background)
- Personality traits (3-5 key characteristics)
- Motivations and fears
- Speech patterns or distinctive mannerisms
- Key relationships
- Character arc (how they’ll change through the story)
I keep these profiles simple—usually one page per character. The goal isn’t to know everything about them before you start (you’ll discover more as you write), but to have a foundation that keeps them consistent.
A word about secondary characters: They need personalities too, just not as much detail. Give each one a defining trait or quirk that makes them memorable. The bartender who always smells like cinnamon. The lawyer who ends every sentence with a question. Small touches that bring them to life.
Map Your Chapters
With your plot outlined and your characters developed, it’s time to zoom in on the structure of your story. This is where you transform your general outline into a specific chapter-by-chapter plan.
Creating your chapter map:
- Estimate your chapter count: Most novels have 20-40 chapters, but this varies widely by genre and style. Thrillers often have shorter, punchier chapters (50-70 chapters). Literary fiction might have longer, more contemplative ones (15-25 chapters). Look at novels you admire in your genre to get a sense of the norm.
- Assign plot points to chapters: Take the major beats from your outline and distribute them across your estimated chapters. For example:
- Chapters 1-3: Introduction and inciting incident
- Chapters 4-10: Rising action and complications
- Chapters 11-15: Midpoint shift
- Chapters 16-25: Intensifying conflict
- Chapters 26-30: Climax and resolution
- Flesh out each chapter: For every chapter, write a paragraph describing:
- What happens (plot events)
- Whose POV (if you have multiple narrators)
- The emotional arc (how does the protagonist feel at the start vs. the end?)
- Purpose (what does this chapter accomplish for the story?)
- Consider chapter titles: This is optional and genre-dependent. Some writers prefer numbered chapters, others use evocative titles. If you’re going with titles, brainstorm possibilities now—they can help crystallize what each chapter is really about.
- Note your transitions: How will you move from one chapter to the next? The ending of Chapter 5 should make readers want to know what happens in Chapter 6. Mark natural cliffhangers, revelations, or emotional beats that work as chapter breaks.
Revisit your Plot Grid: Update it based on your chapter map. You might discover that what you thought would be one chapter is actually three, or that two slow chapters should merge into one.
This detailed chapter map is your blueprint. When you sit down to write Chapter 12, you won’t be staring at a blank page wondering what happens—you’ll know. You’ll just need to find the right words to tell it.
Write Your First Draft
This is the moment you’ve been building toward. All the planning, all the preparation—now it’s time to translate it into prose.
Before you begin:
Set a routine: Decide when and where you’ll write. Daily consistency matters more than marathon sessions. Even 30 minutes a day adds up—that’s 200-300 words, which means a 60,000-word novel in about 200 days. Can you commit to that?
Establish your environment: Find what helps you focus. Some writers need complete silence. Others want background music or coffee shop ambiance. Experiment until you discover your sweet spot.
Silence your inner editor: This is crucial. Your first draft is not meant to be perfect. It’s meant to exist. You’ll fix the prose later. Right now, your job is to get the story down.
Writing the draft:
Follow your chapter map: Start with Chapter 1 and work your way through. Your map tells you what needs to happen, but the exact dialogue, descriptions, and pacing—that’s where the magic emerges.
Don’t get stuck on perfection: If you can’t find the right word, use a placeholder. If a scene isn’t flowing, write a summary of what happens and move on. You can fill it in during revision. The momentum of moving forward is more important than getting every sentence right.
Allow for discovery: Your outline is a guide, not a prison. If a character takes you in an unexpected direction, follow them—as long as it serves the story. Some of my best moments came from discoveries I made while writing, not from my outline.
Track your progress: Whether it’s word count, chapters completed, or time spent writing, track something. It’s motivating to see the numbers grow.
Maintain continuity: Keep notes about details you might forget. What color are the protagonist’s eyes? What was the weather in Chapter 3? These small details matter for consistency.
Write the ending: Even if it’s rough, even if you know you’ll change it, write an ending. There’s something psychologically powerful about typing “The End” on your first draft, even when you know the real work is ahead.
How long should this take? There’s no universal answer. Some writers complete a first draft in a month (looking at you, NaNoWriMo participants). Others take a year or more. What matters is consistent progress. If you’re writing 500 words a day, you’ll have a 90,000-word draft in six months.
Complete Your Initial Revision
Congratulations—you’ve written a novel! Now comes the part many writers don’t anticipate: your first draft is just the beginning.
The cooling period:
Before you revise, step away. Give yourself at least two weeks (a month is better) before reading what you wrote. This distance is essential. It allows you to return with fresh eyes, seeing the story more like a reader than the person who just spent months living inside it.
During your break: Read novels in your genre. Notice how published authors handle pacing, dialogue, description. Fill your creative well.
The first read-through:
When you return to your manuscript, resist the urge to edit immediately. First, just read it. Pretend you’re a reader who picked up this book at a bookstore. What works? What doesn’t? Where does the pace drag? Where are you confused?
Make notes, but don’t fix anything yet. You’re assessing the big picture:
- Plot: Are there holes? Do all the threads resolve? Is the pacing right?
- Characters: Are they consistent? Do their arcs complete satisfyingly?
- Structure: Does each chapter earn its place? Is anything redundant?
- Stakes: Do they escalate appropriately?
- Theme: Does your intended meaning come through?
The revision plan:
Based on your notes, create a revision plan. Prioritize big-picture issues before sentence-level ones:
- Structural changes: Reordering chapters, cutting or adding scenes, reorganizing timelines
- Character work: Strengthening arcs, making motivations clearer, adding depth
- Plot fixes: Filling holes, clarifying confusion, removing inconsistencies
- Scene-level editing: Improving individual scenes for clarity and impact
- Prose polishing: Finally, the sentence-level work—word choice, rhythm, clarity
Tackle one layer at a time. Don’t try to fix everything at once. You might do a full pass just for character consistency, another for pacing, another for dialogue.
Use your Plot Grid: Go back to it during revision. Does the finished manuscript match what you planned? If not, is that a problem or an improvement? Update the grid to reflect what you actually wrote—it’ll help you see structural issues.
Track your changes: Use your software’s track changes feature or keep a separate document noting major revisions. This helps if you need to reference earlier versions.
Know when to stop: You can revise forever, but at some point, you need to either move to the next stage (beta readers, professional editing) or accept that this manuscript is a learning experience and start the next one.
Additional Tools and Resources
As you work through this process, here are some resources that might help:
For plot structure:
- “Save the Cat!” by Blake Snyder
- “The Anatomy of Story” by John Truby
- My article on the ABDCE Structure
For character development:
- “The Emotional Craft of Fiction” by Donald Maass
- “Creating Character Arcs” by K.M. Weiland
For revision:
- “Self-Editing for Fiction Writers” by Renni Browne and Dave King
- “The First Five Pages” by Noah Lukeman
Writing software:
- Scrivener (comprehensive organization)
- Google Docs (simple, collaborative)
- Microsoft Word (familiar, reliable)
- Atticus (new, promising all-in-one tool)
Final Thoughts
Writing a novel is a marathon, not a sprint. It requires discipline, patience, and the willingness to keep going even when it feels impossible. But if you break it down into manageable steps—seed the idea, outline the plot, map the structure, develop the characters, write the draft, revise the manuscript—the impossible becomes merely difficult. And difficult is doable.
Remember, every published author started exactly where you are now: staring at a blank page, wondering if they could actually do this. They could. You can.
Your story is waiting. It’s time to write it.
Have you used any of these techniques in your own writing process? What works for you? I’d love to hear your experiences in the comments below. And if you found this guide helpful, don’t forget to download my free Plot Grid template to start mapping your next novel.